Sunday, February 5, 2012

Hello Autumn! Whoopie Pumpkin Pies!

As soon as September rolls around, the craving for anything pumpkin flavor hits me like a ton of...well...pumpkins. I cannot wait for that first Pumpkin Latte from Starbucks (although I will only order it once to say I've had it. After that, I order a Chai Tea Latte with 2 shots of pumpkin! YUM!) along with a pumpkin scone. Of course, it's time to start stock piling all the pumpkin puree I can at the supermarket before my friends and fellow pumpkin obsessed buy them all up!

While scouring the web for pumpkin recipes, I came across this one and for some reason, I knew I had to try it! Turns out, I loved it. Better yet, the KIDS loved it! This one is a hit!!


Neely's Whoopie Pumpkin Pie

For the cookie:
Filling:
  • 4 ounces cream cheese, room temperature
  • 1/2 stick unsalted butter, room temperature
  • 2/3 cup confectioners' sugar (start of with this amount, but you'll probably need to add a lot more)
  • 1/4 cup canned pumpkin puree
  • 1/4 teaspoon ground cinnamon
  • Pinch salt
Preheat oven to 400 degrees F.

Using a stand mixer, add the butter and sugar and beat together until light and fluffy. Add the egg, then the buttermilk and the vanilla. Whisk together the flour, cocoa powder, baking soda, baking powder, and salt in a medium bowl. Add the dry ingredients in increments to the wet ingredients. Mix until just combined.

Drop heaping tablespoons of the batter onto parchment lined sheet trays, leaving a 2-inch space between each cookie. Put in the oven and bake for 8 minutes. Remove from oven and let cool on rack.

Beat together the cream cheese and butter, in a small bowl, until smooth. Slowly add in the confectioners sugar. Once smooth, add the pumpkin puree, the cinnamon and a pinch of salt. Beat until smooth and well mixed.

To assemble the cookie, spread a heaping tablespoon of the filling to the flat side of a cookie and sandwich with another. Repeat with the remaining cookies. Transfer to a serving platter and serve.


I have to say, that this was one of the funnest recipes I've made. I just had a great time working this one. I will say though that after reading the reviews and changes others had made, that you do indeed need to add A LOT more confectioners' sugar to the filling mix to thicken it up. If you don't, it WILL be runny! I also found that putting in the fridge for a little bit to set them up, helped a great bit too. But regardless of those little quirks, the Whoopie Pie made my family WHOOP for joy!

Recipe curteousy of Food Network: The Neely's.


Back to School with Giada's Lemon Ricotta Cookies with Lemon Glaze

Waaaaaaay back towards the end of August, my kids headed back to school. Being the good Mommy that I am, I wanted to give them a little treat for them to enjoy when they came home from their first day.

Instead of going with the traditional Chocolate Chip or Peanut Butter cookie that the kids all crave, I did something a little more...shall we say....selfish?

Ok, ok...these weren't JUST for the kids. I had been wanting to make these cookies for a while now and I just needed an excuse. I love anything lemon and throwing in that twist with the ricotta cheese had me intrigued.  Not to mention, it's a cookie created by one of my favorite celebrity chefs - Giada.

So after I shooed the kids out the door in the morning and spent some quality 'me' time by cleaning and playing on Facebook, I decided it was time to knock these out!

Lemon Ricotta Cookies with Lemon Glaze


Cookies:

Glaze:


Preheat the oven to 375 degrees F.


Cookies:

In a medium bowl combine the flour, baking powder, and salt. Set aside.

In the large bowl combine the butter and the sugar. Using an electric mixer beat the butter and sugar until light and fluffy, about 3 minutes. Add the eggs, 1 at a time, beating until incorporated. Add the ricotta cheese, lemon juice, and lemon zest. Beat to combine. Stir in the dry ingredients.

Line 2 baking sheets with parchment paper. Spoon the dough (about 2 tablespoons for each cookie) onto the baking sheets. Bake for 15 minutes, until slightly golden at the edges. Remove from the oven and let the cookies rest on the baking sheet for 20 minutes.

Glaze:

Combine the powdered sugar, lemon juice, and lemon zest in a small bowl and stir until smooth. Spoon about 1/2-teaspoon onto each cookie and use the back of the spoon to gently spread. Let the glaze harden for about 2 hours. Pack the cookies into a decorative container.


Before the glazing...

After glazing...Yum!

The verdict?

I could eat the glaze by the spoonful!

My husband and I LOVED them. My middle son, Jason did as well. (He's a lemon lover like me.) But the other two would of preferred the Chocolate Chip cookies. Stinkers!

I think these are wonderful cookies for perhaps a little more grown up palate. Serve with a warm cup of tea and you've got yourself a delicious ending to a lovely little luncheon with some friends.

Enjoy!

Working out the details - Giada's Raspberry Pound Cake with Vin Santo Cream

With Gourmet Club starting up, my board and I needed to get together and go over details, come up with our new by-laws and start planning for our 'Welcome Coffee' where we sign up new and returning members for the club.

I decided that I wanted to serve my girls Giada's Raspberry Pound Cake with Vin Santo Cream as a little treat to gnaw on while we knocked out all the details.


Raspberry Pound Cake with Vin Santo Cream

                    For Pound Cake:
  • 1 1/2 cups all-purpose flour, plus more for dusting the loaf pan
  • 1 teaspoon baking soda
  • 2 teaspoons orange zest (from 1 medium orange)
  • 1/2 teaspoon ground cinnamon
  • 1/2 teaspoon salt
  • 1 1/3 cups sugar
  • 1/2 cup (1 stick) unsalted butter, at room temperature, plus more for greasing loaf pan
  • 3 eggs
  • 1 teaspoon vanilla extract
  • 1 (10-ounce) bag sweetened, frozen raspberries, thawed and drained
Set an oven rack in the lower 1/3 of the oven and preheat to 350 degrees F. Grease and flour a 9 by 5 by3-inch loaf pan.
In a medium bowl, combine the flour, baking soda, orange zest, cinnamon, and salt. Whisk to combine. In a separate bowl, using an electric mixer, cream together the sugar and butter until blended, about 30 seconds. With the machine running, add the eggs 1 at a time. Add the vanilla extract. Add the dry ingredients, a small amount at a time, until just incorporated. Using a rubber spatula, fold the drained raspberries evenly into the batter.
Pour the mixture into the prepared pan and bake until a toothpick inserted into the center of the cake comes out clean, about 55 to 60 minutes. Let the cake cool in the pan for 10 minutes then transfer to a wire rack to cool completely. (Cake may deflate in the center during cooling)

Vin Santo Cream
  • 1 cup heavy whipping cream
  • 1/2 teaspoon vanilla extract
  • 3 tablespoons powdered sugar
  • 3 tablespoons Vin Santo wine or Moscato wine
In a large bowl, beat the cream until it holds soft peaks.
Add the vanilla extract, powdered sugar, and Vin Santo. Continue to beat mixture until cream holds stiff peaks.

Transfer the pound cake to a serving platter. Slice and serve with the Vin Santo Cream.

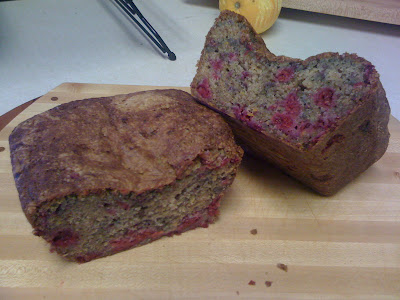
I could not find any Vin Santo wine, so I used a Barefoot Moscato wine, which worked very nicely with the cream. The ONLY issue I had with the whole pound cake was the raspberry seeds. I'm sure there's got to be frozen, seeded raspberries out there somewhere. Right?  But other than that, I really enjoyed this pound cake. The Mascato based cream took it to a higher, richer level so I wouldn't skip that.


 If you notice in the pic, I had a little 'sinkage' on the top of the loaf. But was rest assured by Giada's website that this was totally normal and not to worry!

The Gourmet girls all seemed to enjoy it and I know my husband really did as well since there were no leftovers for later.


(On a side note: I really need to stop using my iPhone to take pictures! Especially since it's a - GASP - 3G! Horrible quality. I apologize!)

I have been SUCH a slacker! A new recipe - Curried Chicken Salad

Today as I synced my iPhone and noticed I had more food pictures on there than actual pictures of people, I realized that I have a TON of recipes that I've tried in the last, oh...6 months or so that I haven't blogged about. Then I thought, 'When was the last time I even did a blog post?' Let's just say, it's been A LONG time!

One of my purposes for creating this Hammie Gourmet blog was to write about my adventures as President of the OWC Gourmet Club here on Camp Lejeune.  I would like to pretty much blame the non-existing posts on this. Being President and running the club has totally cleared out any free time that I wanted to devote to writing and blogging. (Although my FB and Pinterest accounts haven't suffered! ;) Thank goodness!)

So here I am, ready to dive back into blogging about my adventures in Culinary delights. I can't make any promises, as this could just be a one day fluke but I'm here to tell you, I'm about to knock out as many of these bad boys as possible!

This recipe I'd like to give props to Care's Kitchen! I've gotten many food inspirations from her blog! The Curried Chicken Salad is to die for if you are a curry lover, like me! I could just eat and eat and eat and eat it. Did I mention, I could seriously eat the crap out of this? I hope you love it as much as I do and if you want more fun and exciting recipes, head on over to Care's Kitchen! You won't be disappointed.


Curried Chicken Salad

3 large boneless, skinless chicken thighs, cooked and cooled (Care's recommended rubbing them with herbs and grilling. I rubbed mine with some evoo and good ol' S&P and baked them in the oven until done.)
1/4 to 1/2 cup Mayonnaise
1/4 cup Plain Yogurt
1 tsp. curry powder (large teaspoon)
1/2 tsp. turmeric powder
1/2 tsp. hot paprika
1/3 cup celery, finely diced
1/4 cup scallion, chopped
2 T. cilantro, chopped
1 T. fresh lemon juice
a handful of raisins
a small handful of sliced almonds
Kosher salt and pepper to taste

Directions:

Chop up your chicken into bite size pieces.

In a medium bowl mix together mayonnaise, yogurt, curry powder, turmeric powder, paprika, celery, scallion, cilantro and lemon juice. 

Fold your chicken into the mayonnaise/yogurt mixture.

Add your raisins and almonds and salt and pepper to taste. Even better the next day eaten cold!
Serve some sliced cantaloupe for a light, delish meal!